AN-121: MDT Battery Replacement
Battery Replacement Procedures and Changing the Initial Meter Reading (IMR) in the CIT
-
- Locate MDT connected to the meter.
- Press the sides of MDT to open.
- Take out old batteries and inspect the terminals.
- If corrosion appears you can usually just scrape it off or use a Q-tip and water to clean terminals. If corrosion has discolored the PC board however, the unit should be replaced.
- After inspection place new alkaline or lithium AA batteries inside terminals. We recommend the high-quality Panasonic battery (Available from Tehama and elsewhere).
- Once batteries are replaced, the MDT will go through its start-up sequence and within 30 seconds or so the LED light should be solid green for 10 seconds. If no LED appears, the MDT may need to be replaced.
- Steps 8 through 10 only apply if you are working on Pulse MDTs. If you are working on an Encoder MDT (e.g. TW0160B-E), then your work on the MDT is done.
- If the MDT battery has been dead, it is best to reset the MDT count back to 0 and record a current IMR meter reading. To do so, press and hold in the button under the Tehama Logo until the LED starts to blink, usually 12-14 seconds. Alternatively, you can remove one battery, then press the button under the Tehama Logo while you re-insert the battery.
- If the MDT was operating before the battery replacement, or you do not care whether the reading on the register face matches what is in the CIT, you do not need to reset the MDT count. In this case, the MDT will pick up from its last count before the batteries died.
- If you do want the reading on the register to match what is in the CIT, you will need to change the IMR in the CIT or on the Mobile App. To do so in the CIT, follow these steps:
- Connect to the Site in the CIT.
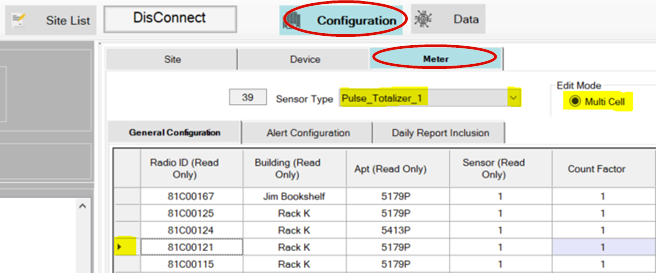
- Locate the MDT Radio ID in the CIT: Configuration Tab > Meter Tab > Pulse_Totalizer_1 > Edit Mode (Multi Cell or Single Cell). This example is using the Multi Cell Mode. If you are wanting to change one field at a time, use Single Cell Mode. Note that a dual pulse MDT (TW160B-PP, TW-170B-PP, etc.) has two Sensor inputs for the hot and cold meters. Usually, cold is programmed under Pulse_Totalizer_1 and hot is programmed under Pulse_Totalizer_2. To locate the Pulse_Totalizer_2 click on the drop-down arrow of the Sensor Type and select Pulse_Totalizer_2 to see all sensor 2 (Hot) meters.
-
- To change the IMR, select the row with the MDT/Apt you are working on and enter the reading from the meter’s register in the Initial Meter Reading at the bottom of the grid. The value entered must include any fixed zeros on the meter. In other words, the IMR you enter should be in the units of the meter, e.g. in Gallons. The date field will automatically be set with the current date. If required by your company, ensure the other fields such as Count Factor and meter serial number are filled in correctly.
- Hit “Update Selected in Top Data Grid with” Highlighted in the chart below.

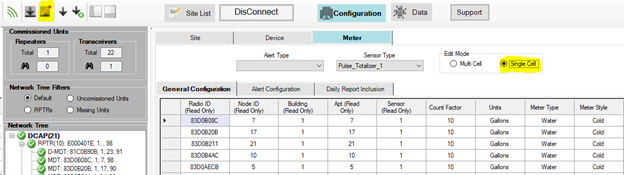
- To make changes in Single Cell Edit Mode, click on the Single Cell button. Then simply click on all the cells that you want to make changes and hit the Save to DCAP button after changes are made.
- Upon hitting “Update Selected Cells in Top Data Grid with” you will see the changes entered in those selected columns. Be sure to hit the Save to DCAP button in the upper left-hand column after the changes have been made.
**Meter Reading x Count Factor = Actual Meter Reading
Example: 123456 x 10 =1234560 Total Gallons**